

Decorating Muzzles
(5 Parts)
This tab covers all things decorating. From painting wire or JAFCO muzzles or vet wrapping and duct taping. Whatever method you use, it is sure to be colourful and fun.
Vet Wrapping The Muzzle (1)
Some members wrap their muzzles in vet wrap to decorate them. This can be used just for looks or to bring more attention to the muzzle to keep people at a distance. Vet wrap sticks to itself and will need redoing depending on much you use the muzzle. It also gets dirty pretty fast.
A member wrapped theirs in vet wrap and even made a how-to video; see HERE


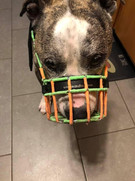
Adding Duct Tape (2)
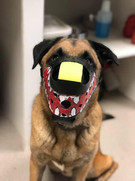
We have had members use duct tape to decorate their muzzles. You can usually find this at most craft stores or online (Amazon/ebay etc). It’s harder work with all the small pieces to wrap and would likely need redoing every so often.
Fully wrapping your muzzle in duct tape can make it slightly heavier for your dog but it usually is not a noticeable difference.
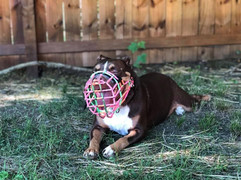
You can also see the rainbow muzzle also has a scavenging guard made from duct.


Adding Semi Permanent Vinyl (3)
Another member has used permanent vinyl to wrap their muzzles. It will stay on better than removable vinyl. Cut the size pieces you need and wrap the wire individually. It will be harder to do on curved edges.
This is just for looks; it will likely eventually come off or be torn if used often. The material does well with being slightly heated up when wrapped around the muzzle to stick better.


Painting A JAFCO (4)
Coming soon

Painting A Wire Muzzle (5)
Lots of people have painted their muzzles. JAFCO and wire are the most common. Make sure you’re using pet safe paint.
How to paint wire is below. For JAFCO, you can follow the exact instructions (without sanding). Clear may be harder to paint, but the black/white should work fine.
You do not need to go out and get every item, but they will help you get a much better finish.
The total cost was $60 for two muzzles using fast dying/safe paint.
ITEMS NEEDED: (For M10)
-
Plastic primer
-
Enamel spray paint (that sticks to plastics)
-
Clearcoat
-
Fine sanding paper
-
Rubbing alcohol
-
Detergent
-
Rags/paper towel
-
Painters/electrical tape (masking tape etc.)
-
Something to cover the leather parts
ITEMS NEEDED: (For M9)
All of the above, but make sure the primer, paint and clear coat are for metal, not plastic/rubber.
STEP 1: SANDING (OPTIONAL)
-
Lightly sand over parts that will be painted. You don't want to use coarse sandpaper as it will create deep grooves. This is optional, but a slight roughness will help the paint stick better.
STEP 2: WRAPPING
-
Wrap the leather on the muzzle using whatever tape/cover you have, making sure to have the least amount of tape touching the parts that will be painted while also covering the leather fully.
-
Another option is to buy new Chicago screws for the noseband and straps (6 total), then take off the leather parts on the muzzle and paint. This way will keep things much neater but does take some time.
STEP 3: CLEANING (SOAP)
-
Use some soap, water and a cloth. Clean the muzzle to ensure it's completely free of dirt/saliva/hair etc. Then rinse with water and dry off.
STEP 4: CLEANING (RUBBING ALCOHOL)
-
Once dried above, lightly wipe down with rubbing alcohol to get any oils off that the soap left. This will significantly help your paint to stick.
STEP 5: PRIMER (SKIP IF NOT USING)
-
Once the muzzle is fully clean and correctly prepared, you can apply the first coat of primer. Be sure to follow the instructions on your paint. Try painting at optimal temperatures for best results and wait the recommended time for respraying.
-
I did the first mist coat, followed by two full primer coats, and then left to partially dry.
STEP 6: PAINTING
-
Once the muzzle is primed and dry to the touch, you can start adding your coats of colour, be sure to follow the instructions on your paint. 3-5+ coats of colour are recommended, though you can tell once painting how much you'll need
-
In the first coat, I did a very light mist. You could still see lots of blacks. I waited the recommended 20 minutes dry time, then resprayed. The subsequent few coats gradually got heavier until the 3rd coat entirely covered the muzzle. I ended up doing another four extra coats to make sure it was fully covered (7 coats colour total).
STEP 7: CLEAR/PROTECTIVE COAT
-
Once you have finished painting and waited the correct amount of time for partial drying, you can now cover in a clear coat; once again, Be sure to follow instructions on the paint you have. It's recommended to do at least three clear coats for good protection.
-
The first coat I sprayed was a light mist, then waited and resprayed two more times with full wet coats (not enough to cause dripping, though). Then left to dry overnight fully.
STEP 8: TOUCH-UPS
-
Once the muzzle is fully painted and dry, you can unwrap the covering on the noseband and straps. It's likely once removed; you will see some unpainted parts. You can get a small paintbrush, spray the paint you're using onto paper, etc. and hand paint the small details you've missed. Let dry and repaint if needed. Then you can also use the same method to cover them in a clear coat.
STEP 9: DRYING
-
Make sure the muzzle is completely dry and smell free before putting on your dog; this may take up to 48 hours from spraying.
-
I also recommend giving a quick wipe over with a wet cloth
COMPLETED!
REMEMBER:
-
Not every paint is going to stick great
-
It's not always going to turn out perfect
-
There are other ways to do it
-
It will chip off eventually, especially if your dog is rough