

Noseband Mods
(3 Parts)
Please note this page is for changing and replacing nosebands, it does not include cutting down the original noseband muzzles have to help length fit better, this information is in the wire/other length mods tab.
Wrapping The Noseband (1)
Some members will wrap their nosebands for extra comfort or to cover the wire after modding down the length. This is also recommended to do if you’ve modified your noseband down to the wire.
-
You can use vet wrap, felt, neoprene, yarn etc.
-
Just remember some things stay on/cleaner than others.
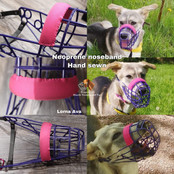
The pictures show multiple examples of members wrapping their nosebands to either create extra padding or just to make it look nice. Either way, it's a straightforward task for most dog owners.


Adding A Noseband/Padding (2)
Some muzzles don’t come with a noseband (like greyhound and Baskerville); adding a noseband yourself can help with comfort. Adding a noseband can take some height, depending on how thick you make it.
-
You can add a noseband to these by using vet wrap, yarn, neoprene etc.
-
It was done by wrapping, sewing, gluing or riveting.


Adding A Biothane Noseband (3)
Some members have removed the nose pad on their wire altogether and replaced it with biothane straps. To do this, you need to remove the rivets from the original nose pad, take it off, measure how much biothane you need, add holes, and use Chicago screws to put it back on.
If replaced with biothane, you will need to keep an eye on the dog's nose as it can cause rubbing on some dogs. You could also use vet wrap over the biothane to add more padding for comfort.
Usually, you will only need 1/2" biothane for smaller muzzles and 5/8" for larger ones, its always best to measure to make sure, but that is the standard for the most part.


Members Custom Noseband (4)
This member has gone to a collar maker and asked for custom nosebands to be made to match their dogs harnesses. We love the idea and think it looks great! They've used nylon type material, press studs to easily remove and soft padding underneath.
This maker was a friend in Europe so you'd be best finding someone close by to do similar
Full credit to Lucia Bohlen for the idea


Making A Noseband (5)
Items used:
-
Biothane (I used 19mm gold standard)
-
Faux leather sheet (I ordered A4 size)
-
Soft Felt sheet (used 3mm thick)
-
Chicago Screws (4mm)
-
Leather Thread (or thick thread) and Needle
-
Scissors
-
Stanley Knife/box cutters
-
Pencil/ Marker
-
Screwdriver
-
Pliers
-
Glue (optional)
-
Rope (optional)
Step 1.
-
Measure the biothane for the length of the muzzle pad and cut it to size.
-
Measure where holes will be for Chicago screws to attach to the muzzle.
-
Drill the holes (used a 4/5mm drill to fit the 4mm Chicago screws)
-
Attach the biothane strip to the muzzle to see if it fits the take off.
-
I kept the flat part of the screws inside the one side of the biothane holes, only taking out the actual screw side.
Step 2.
-
Measure felt. One-piece to go underneath the biothane and one piece to go on top. (See diagram)
-
From the diagram, you can see where I cut two pieces out of the felt (top piece) 1 either side, so the screws on the biothane are visible for easy screwing.
-
Stitch the two felts together with the biothane sitting inside.
-
At this point, I cut and glued a soft piece of rope to the top of the felt. (See diagram). This is where the metal of the muzzle would be hitting my dogs face. This acts as a barrier.
-
Measure and wrap faux leather around to cover (diagrams for the shape I used). Again cut two pieces out the same as we did for the felt to allow for re screwing onto the muzzle. (I glued the two leather ends together so that I could stitch without it moving or opening up).
-
Cut felt to size for placement underneath the leather where the nose would touch. (This is optional, but I did it to prevent any rubbing on my dog's nose).
-
(You can use glue lightly to stick the pieces together to make it easier to stitch for the next step. This can stop any movement.
Step 3.
-
Stitching it all together, leather and felt, to prevent any moving and to seal the sides.
-
I used leather thread and a thick sharp needle. I went around the edge as neatly as I could.
Step 4.
-
Attach to muzzle. I had to get extra hands to help for this as the biothane is thick and to be able to close the Chicago screws I had to use pliers to help press the biothane down for it to line up.
-
I also stitched the nose pad to the muzzle with two loops to keep the rope barrier in place.
credit to Sophie Price